Saturday 31 December 2011

In and around the tree

I've been working on a commissioned tree quilt (the one with the possum) for a couple of weeks. It's now all quilted and ready to be bound, and here are a couple of peeks. I'm hoping to get it bound tomorrow (well, today really!) as my last finish of 2011.


I used the same background quilting as on my last few quilts - the paisley/swirl/feather combination. But for added interest, in contrast thread there's a small quote ('love is everything' - I've no idea of the source, or of the particular significance, it was just a request) and a couple of birds. Later I'll show the plumes of freehand feathers coming from the birds' tails - a very subtle effect, but one I really like.

From New Beginnings

I've showed a few progress photos of this quilt, but not the finished product - finished in a real rush fro James' teacher before school ended for the year. We've been really lucky for James to have had such a terrific teacher for his first year of school, and are hoping next year's teacher is as good.


It's about 60in square, and the palette was based around some Fleur Nouveau prints I had, which I thought his teacher would like. There are close to 800 1in x 4in (finished size) pieces in the background.

The applique took way longer than I'd anticipated, mostly due to the swirly shape I designed. I still love the look of the shape, but it was a curse to applique neatly - and I got tired of them well before all 16 were done!

To stop the dark background fabrics showing through the white applique shapes (whch I'd actually decided partway through to do in a soft green, then forgot when it came time!) I doubled them - i fused a second layer (of slightly heavier plain white) to the back of the fabric, then fused the shapes and cut them out. It worked well.


Positioning the applique pieces was done mostly by eye, although I did use a ruler to keep the distances from the centre even, and used some of the background piecing as a bit of a guideline.


Positioning of the background fabrics wasn't overly planned. I knew the effect I wanted (darkest in the centre, fading to white at the edges) and bore that in mind as I paired and pieced the strips. This method is much faster than working out an exact layout, but less precise, and I can see places where I'd rearrange a few pieces. But without a design wall, it's not really a practical option, and the overall effect is still good.


I quilted around the applique shapes, then filled the background with a variation on my current favourite - the combination of triple-paisleys, swirls and trios of double-feathers - with the addition of a heart-like shape to match the applique. You can see a heart shape in the photo below if you look carefully.


I bound the quilt in a spot print, which was a pain. I had to trim (waste!) a bit between each strip to get the spots even on each length of the binding, and then realised afterwards that although they all matched, the spots were poorly positioned. I ended up machining the binding to the back and hand stitching it to the front (the opposite of my usual and preferred method) to get some of the spots to show, and even then, they're not centred on the visible part. I'll think twice before using spots on a binding again! At least they're even - I hate seeing a spotty binding where the spots aren't straight; they make the whole quilt look wonky.


The quilt was well received, but classrooms are very busy in the morning in the last days of the year, and I didn't have a chance to take a photo of James with his teacher and her quilt.

Friday 30 December 2011

Summer

We're enjoying a relaxing few days up at the holiday house, and I'm having fun with my new toy - Simon got me a laptop and mobile internet for Christmas, so I can keep in contact while we're here. The downside is that I've wasted rather too much time playing with my new toy, and done less quilting so far than planned!

Here are James and Eleanor at lunch this afternoon - being indulged in blowing bubbles in their drinks.


I'm not looking forward to the next four days; it's meant to be over 36C, and I plan to sit right in front of the airconditioner on New Years' Day when it's meant to be 41C - unbearable!

Sunday 25 December 2011

Merry Christmas!

The stockings have been hung, and Father Christmas has stuffed those two stockings within an inch of their lives (every trick in the book was used to get the contents in - removing packaging, stabbing holes in packaging to squeeze all the air out, repacking, clipping items to the stocking, hanging things over the edge, filling the pencil cases with things to poke out the top...)


He has also constructed a set of monkey bars in the garden, drunk a glass of water, eaten two home-made mince pies (and left behind a thank-you note and a trail of fine red glitter-dust) and placed the parcels beneath the tree. And now he's too tired to quilt, and is heading off to bed before either child (most likely Eleanor) appears for a midnight glass of water or a cuddle and wonder...


Merry Christmas to all
                and to all a good night!

Saturday 24 December 2011

Font and quilting

I've been busy quilting the last few evenings, but until tonight it's been quilting in the ditch around all the applique. With a tree, 7 blossoms, 21 leaves, a bird and 10 letters to go around, that took a while. It's not much to show on a blog though - despite the enormous but subtle benefit to the overall look of the finished quilt!

(appliqued bird prior to quilting)

But this evening I've quilted a quote and a couple of birds in a contrast thread (pinky-lavender machine-embroidery thread), fun free-hand feather plumes coming from the birds' tails in a lightly-contrasting thread (pale pink BottomLine), and a chunk of the background (cream BottomLine), using the swirls/triple-paiselys/double-feather-trios pattern I used recently.

And for the curious, the font I used for the applique is:

Friday 23 December 2011

The Magic Cave

On Wednesday, I took James and Eleanor to see Father Christmas at the Magic Cave:


Thanks goodness for the drawing and reading books I took, a friendly mother next to me in the queue, and Simon for leaving work to come and take them out (to the free state museum across the road) for an hour, given ti was a 2-hour wait! Next year I'll take them out of school one day in early December and beat the crowds! Luckily it was worth the wait - they thoroughly enjoyed it. Thank goodness also for the revised Christmas Day forecast - instead of a stifling 37C, we're expecting a much more manageable 30C.

Wednesday 21 December 2011

Preparations

I've been busy again on my current tree quilt - although I'm having an 'early' night. It's been after 4am the last three mornings, but after this I'm heading to bed .I'm planning to be in bed by 3am so I can get up relatively early and take James and Eleanor to see Father Christmas at the Magic Cave - early or the queues will be completely horrendous! While we're out I have to choose the Christmas chocolates (loose ones from the David Jones Gallery), get one last gift (Simon's! - I have 3 good ideas, so it should be reasonably quick/easy) and pick up a few items at the supermarket.

I'm actually pretty organised (well, apart form one quilt which just won't happen for Christmas), and am keen to get wrapping, but as we missed the Carols by Candlelight due to rain on Sunday, I'm planning a fun evening for James and Eleanor on Christmas Eve. We'll watch the Melbourne Carols by Candlelight on television and make a bit of an event out of it; light our own candles, eat chocolates etc. and wrap the presents together.

Tomorrow afternoon James and Eleanor will have a nap and then write the cards they made this morning and I plan to get this quilt top done and sandwiched, and hopefully spend some time refining a few new designs. There are only a few small appliques to add to this quilt now, and I've already marked a couple of quilitng designs. Today I finished adding a name (love the font!), added the border and did lots of prep work.

(please ignore the ironing-board cover print showing through!)

Tuesday 20 December 2011

Becoming visible

Just like Hush, my possum slowly became visible, from the tail up...


I'm delighted with how she turned out! The twice-stitched applique is hugely effective - I used about 8 threads all-up, with many, many thread changes as I went.


All done by machine - except the whiskers, which I hand stitched with a single strand of charcoal BottomLine.

Saturday 17 December 2011

Applique threads and stitches

Thread selection...


It's getting easier as my thread-stash grows, but of course I don't always have the perfect choice, and it took a while working through the options to decide on the closest colours. Luckily I can manage with what I already have, given I want to get this quilt done as soon as possible. I'll be using a variety of threads - colour si the most important factor here. The BottomLine on the left will be for the bobbin this time, but threads I've chosen for the top include Guterman 50wt cotton, King Tut 40wt cotton, an unknown machine embroidery thread (probably rayon) and Rainbows and Living Colours (both 40wt poly).

As this is a commissioned piece, I decided to do things properly, and test out the applique stitches and threads on a sample. I fused the off-cuts from the possum to a scrap piece of background, and played around with my chosen stitch - I want the possum to look cute and furry, so an using a variable zig-zag stitch which changes on both sides. It has quite a long repeat, so leaves a nice random effect.


I workd out the best stitch length and width, plus the colours and combinations to use on each part of the possum (the tree and the strawberry with be in my usual small machine blanket-stitch). For most of the possum I'll be going over the blanket-stitch twice, using a different colour the second time. I even wrote down my selections, and for future reference, I'm using stitch 150, with a base length of 50 and width from 4 - 6.

Applique fabric selection

Selecting the fabric for the tree was pretty straightforward, but choosing the possum fabrics took a while longer. I really wanted to get the right part of each fabric for each piece, to help make the possum more realistic.


So, out came Possum Magic (my initial design reference) for colour and shading assistance, as well as my drawing. I traced the shapes onto Lite Steam-a-seam2 and trimmed them neatly, then traced second copies onto tracing paper, and cut these out quite roughly. I should add here that I am using the Mont Marte tracing paper I mentioned a while ago, which is very strong and rather like vellum - but still cheap.


I used the tracing paper pieces to selet which part of the fabric would work best for each piece - I'd already done the body (the hole you can see above), and this is the shoulders/arms section. I wanted darker arms, but lighter in the centre, where it should blend with the light body. I pinned the heavily-traced piece in place, then turned it over on the lightbox, using the tracing paper piece to help position the steam-a-seam correctly on the reverse of the fabric. I pressed it on with the palm of my hand to hold it until I could steam it on permanently. Then I just removed and discarded the tracing paper.


Then I went to find a nice red for the strawberry, and remembered this print! The original strawberry on the steam-a-seam is a btu uner 1/2in tall, and the small ones on the fabric will be close enough in size to work - perfect!


The next step is to carefully position and layer all the pieces correctly, then remove the upper layers while I fuse and applique the first ones, and accurately reposition the subsequent layers when I'm ready to add them.

Friday 16 December 2011

Fudging applique - mini tutorial

I'm working on a new Tree quilt - another commission. The fabric I selected for the tree is a lovely wood print, but it has a few knots in it, which look a bit odd when they appear on a relatively small branch (most of the branches are a bit under 1/4in wide.


So once the tree, traced on Lite Steam-a-seam 2 and trimmed, is placed on the chosen fabric, I move it to the best position in terms of print patterning and economic fabric use, then 'bend' the branches away from the knots where necessary. The photo above shows a narrow branch falling partially across a knot, which I wanted to move.


This photo (above) shows how I cut the fusible web - a simple slit through the branch almost to the cutting line on one side (from the left in this case), and opposite, a teeny-tiny wedge (about 1/8in wide) on the side towards which I'm going to bend the branch. The tip of the wedge is about 1mm (yes, I know I'm mixing my measurements!) from the end of the slit - handle it carefully.


Then it's just a case of bending the branch gently away from the knot and repositioning it. I don't need to bend it far to get it clear. Steam-a-seam is great for this, because a quick press with your hand will hold it temporarily in place (it's still easily re-positionable though) until it's pressed permanently in place with the iron. The tiny gap in the fusing (remember I'll cut it out along the drawn line after ironing the tree in place) isn't big enough to be a problem one I've appliqued it with a small machine buttonhole stitch.


The same technique can be used on wider pieces, too (this section above is about an inch wide at the slit.

When cutting it out, you just need to carefully smooth-out the adjusted curve on either side so there's no kink - only a small adjustment is necessary.

Kindy Christmas concert

Yesterday evening was the Kindergarten Christmas concert. It's held in the native garden at the kindy, and was a lovely evening for it; still comfortably warm when we left at 7.30. I didn't get any good photos of Eleanor in the concert, although I did get some nice (and at times amusing) footage of her singing. Unfortunately she wasn't too well and had just woken from a nap bafore we went, and she yawned spectacularly through the entire thing!


I spent the hour or so prior to the concert madly sewing the labels onto the teachers' quilts. I decided some time ago that they'd get one quilt each to cover both James and Eleanor, and have been working on them through the year. The director is doing a teacher exchange through 2012 with a Canadian teacher, so I needed to have hers ready as a Christmas gift rather than a last-child-leaving-kindy gift, and figured I'd gift them all at the same time - if nothing else, it's cleared 3 decent sized quilts from my sewing room!


They were all really well-received. I tried to pick appropriate colours based on their clothing and accessory choices - a bit fo a risk, but I think I got it right. Top is the director receiving hers, which I called Maple Syrup in a nod to her coming year in Canada. Next is the teacher (and next year's director) with Mother of Pearl, which luckily arrived back from Australian Patchwork and Quilting just 3 days ago, and which I finally photographed properly only yesterday morning! (blog post to come). And below is the other staff member, with Building Blocks, which I chose because of her fondness for bright colours. The name seemed to suit a kindy teacher's quilt!

Monday 12 December 2011

Christmas Tree

Spending the day putting up the Christmas tree and lights with 4- and 6-year-old assistance doesn't get a lot of quilting done, but it's definitely more fun - especially when the quilting doesn't go as smoothly as planned when you do eventually sit down at it. I can't delay too much though - this quilt is for James' teacher, and this is the last week of term!


We went to a bigger Christmas tree farm this year, and picked out this beauty. It's about 9ft tall - a perfect fit, as the tree-topper is only about 10cm/4in from the ceiling! If I ever want a bigger tree, I'll need a new house.


I've discovered an improved way to photograph the tree. First put a Christmas quilt beneath it. Then, focus with the tree lights off, then get a helper to turn them on for the photo (2nd photo)! It took 600 fairy lights to get the tree glowing to my satisfaction.

We don't put the presents under the tree until Christmas Eve. Although Father Christmas only fills the stockings in this house, with Shadow and Cocoa inside much of the time, it's not a risk I'm willing to take.

Friday 9 December 2011

Procrastination bonus

I've been so busy procrastinating (yep, that applique again!) that my sewing room is all tidy again! It took a big effort, but it's so much better, and I found a few things I'd been looking for. One small thing which made a big difference was deciding to let go of many of the boxes which fabric has arrived in. I've kept a couple, but piles of empty boxes take up a lot of unnecessary space!

Now I just have 3 more pieces to applique, and having got through a few yesterday, I'm confident they won't take long this evening, and then the decks are clear to start on my next project - the starting palette is below (minus the top pinks):

Wednesday 7 December 2011

More applique

I'd like to file a complaint with the part of my body which thought it was ok to fall victim to a cold - I really don't have time for it! So I'm dosed up on cold and flu medication and doing a bit more applique.


These black shapes are at least faster than the white ones, simply becasue the individual applique stitches aren't visible, so they don't have to be so perfect. For once, I'm willing to live with that! I've sewn on four, and have another eight to go - I really would like them all done this evening, but I'm making no promises! I can't say I'm enjoying the applique on this one, but I am really looking forward to quilting it; apart from outlining the appliques to smooth the edges, it will be an allover that I've been wanting to quilt for a while, and keep finding myself doodling.

Monday 5 December 2011

Colour Play

I made this quilt back in April for a friend's baby, but somehow neglected to blog the finished item.


I should be appliqueing again tonight, but have even less motivation than usual, since I'm getting a killer sore throat. I'd go to bed, but there's a program I want to watch at 11.30, so I'm getting a few things done in the meantime.


Colour Play is made from Vicki Welsh's hand-dyed gradients, which I just love using.


I quilted each column with a figure-of-eight loop, using matching threads. Some columns have only one colour thread, others up to three.


It's an incredibly simple quilt, to show off the fabrics. It's also fulfilling my intention to make some simpler baby quilts to ease my load somewhat.


Now here's hoping my sore throat isn't the start of a cold!


Sunday 4 December 2011

Feathered Friends

This tree quilt that I've been working on for ages was one of the quilts I photographed this morning. I'm thrilled with it. It's a commissioned piece, and the recipients have been pleased with what I've shown them, so I think they'll be happy, too.


I'm so glad I took that daunting step of cutting the initial tree out and replacing it with one that would stand out nicely - it was definitely worth the worry, and the effort!


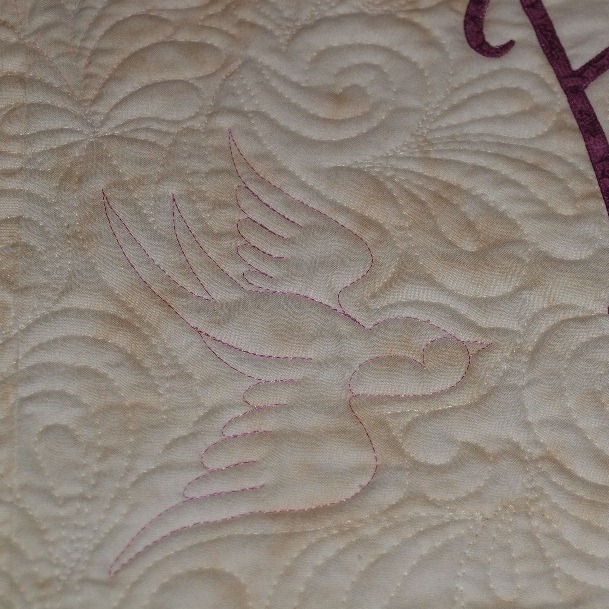
The birds were a request, and definitely a good addition. I adapted them from various clip-art style silhouettes I found online. I'd thought I'd managed to get two of them facing in the other direction, but I do kind of like the sole 'pair' of birds.


As regular readers would know, I ditered over the leaves, and in the end added a lot more than planned, in 4 different greens, giving the tree a much more natural feel. The leaves are between 1.5 and 2 inches long.


As with any finished quilt, I can see a few things I'd change, but nothing major on this one. I'd tilt the lower left-hand leaf in the other direction, I'd turn another bird to the right, and I'd not have the outer ribbons cross at the sides - just meet at a point like the inner ribbon.


Quilting-wise, I'd redesign the feather motifs at the bottom to reach the outer ribbon at the bottom.


But I'm really pleased with the feathers on this. I marked the feathers up to the point where they go up the sides, then just marked the spine, and I marked the top motif; the rest is freehand, and it's all free-motion. The feathers are all quilted in a mauve embroidery thread to help them stand otu a little, and that worked very effectively - and my care (and reduced speed - my default is pretty much full-speed, and I have to work hard to keep slower!) while quilting them means there are no obvious wavers.


I used a ruler to free-motion the piano key border, which was a bit of a drag to do, but again, definitely worth the effort. I repeatedly cursed my decision to echo the feathers to fill the space around them the whole time I was doing it, but in hindsight it was the right decision. Even though they're not perfect individually, the overall effect is certainly what I wanted, and I'm happy with that. Certainly, neither little miss Tilley, nor her parents, will be judging it!


I threw in a little curved cross-hatching. I drew it freehand, but did mark it - however I'd only designed it with half the lines, and went back and added the extras without markings.


The quilting that I'm totally in love with though, is the fill around the tree. Inspired by this background quilting by Judi of Green Fairy Quilts, I doodled for weeks and came up with my own version, which I couldn't wait to quilt.


This was the first time I'd quilted it, and I started out a little on the large side on the left of the tree, but the right is about perfect. It's a combination of extended swirls, sets of up to 3 small double feathers, and triple-paisleys, with a few echo-lines where needed. I learned a bit while quilting it about how to fit it into spaces and against applique, and that no matter how small, the feathers should always be double to keep the look consistent. I'll definitely be quilting this one over and over again!


It's not perfect for fitting into small gaps, such as between the roots, but it's workable, and in open areas it's gorgeous. This design is also a nice change from the McTavishing I've always done around the trees before. It's fun to quilt, and reasonably fast, given its density.

Now I've finally decided on a name, I can do the label, and this quilt is finished. My next commission si a similarly-sized tree, but will have quite a different look (although I definitely plan to use the same background quilting!).